An outside mitre that closes tight in August can show a hairline in January, when the heat is running and the stock gives up the moisture it took on all summer. That is the whole problem with trim in a Houston house, and it is why the stock gets acclimated inside the conditioned space, why outside corners get glued as well as nailed, and why fasteners go into studs, plates and blocking instead of into drywall alone.
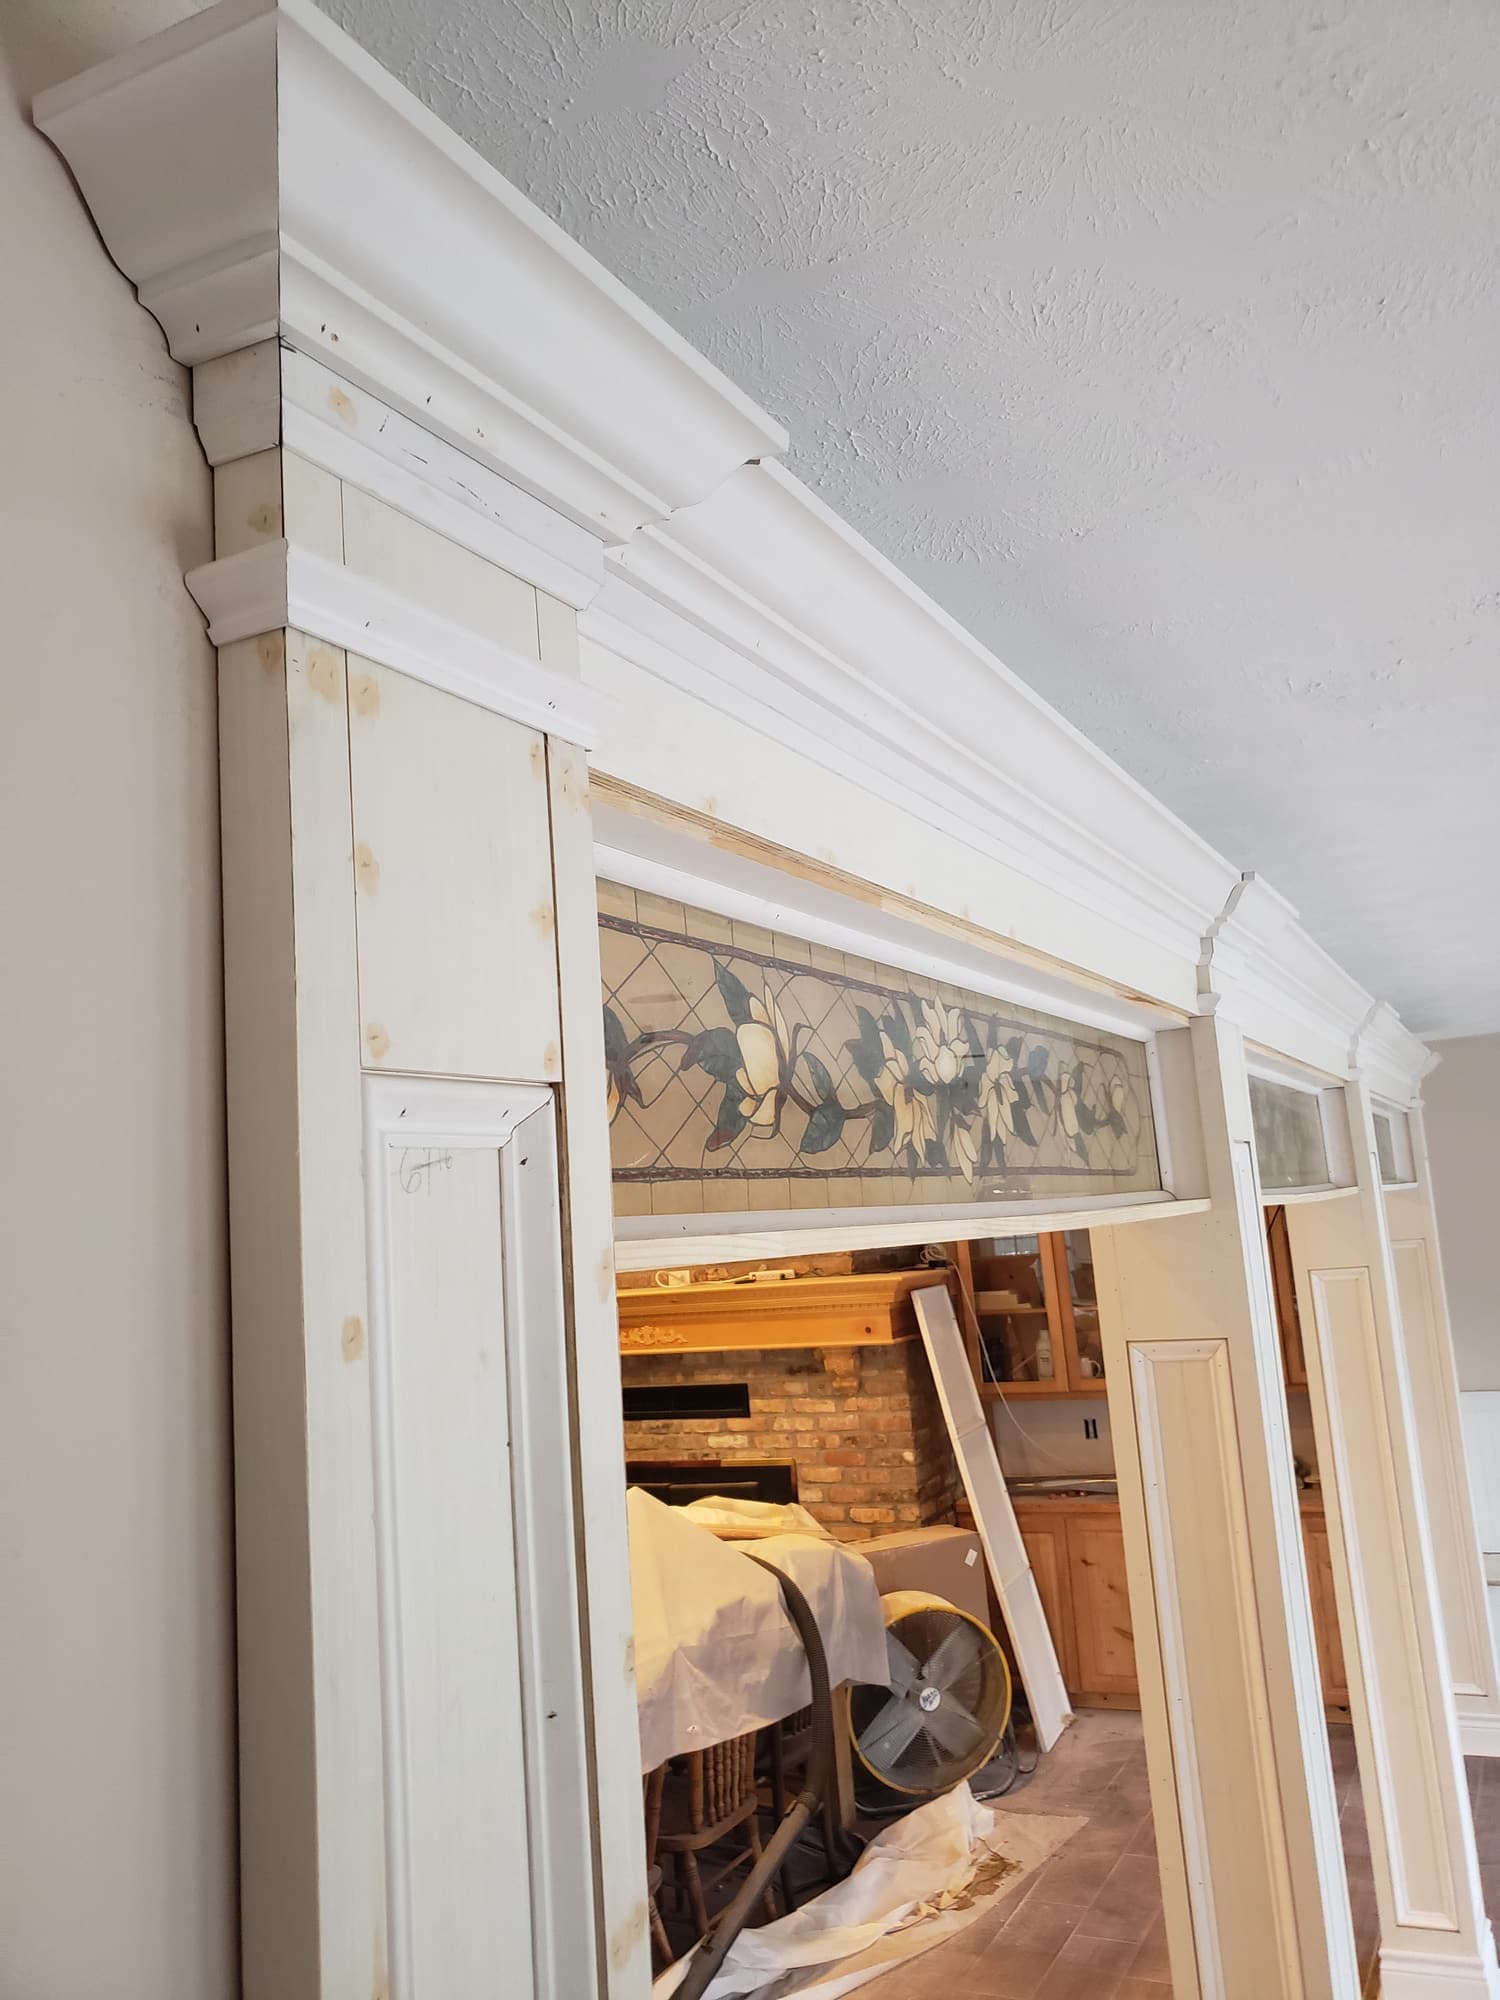
Primed crown, casing and base staged inside the house before cutting. The stock sits in the conditioned space with the air running so it moves before it goes on the wall, not after.
Trim is rarely the whole job. It is the last few days of almost every remodel we run, and after more than 15 years in the trade it is usually where a job is judged: the reveal on a door casing, whether inside corners are coped or mitred, whether a base run reads as one straight line or as three pieces. On a kitchen remodeling or whole home remodeling project it also carries the transitions, closing the gap between new drywall, new flooring installation and finished cabinetry.
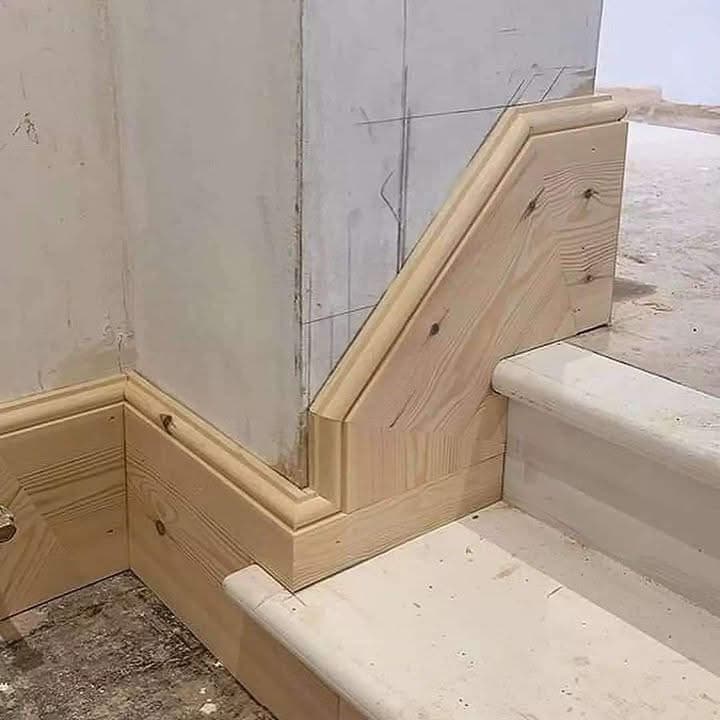
Baseboard and stair skirt mitred into the stringer. Treads, skirt and wall base all have to meet on one line, and the cut has to hold when the stair takes traffic.
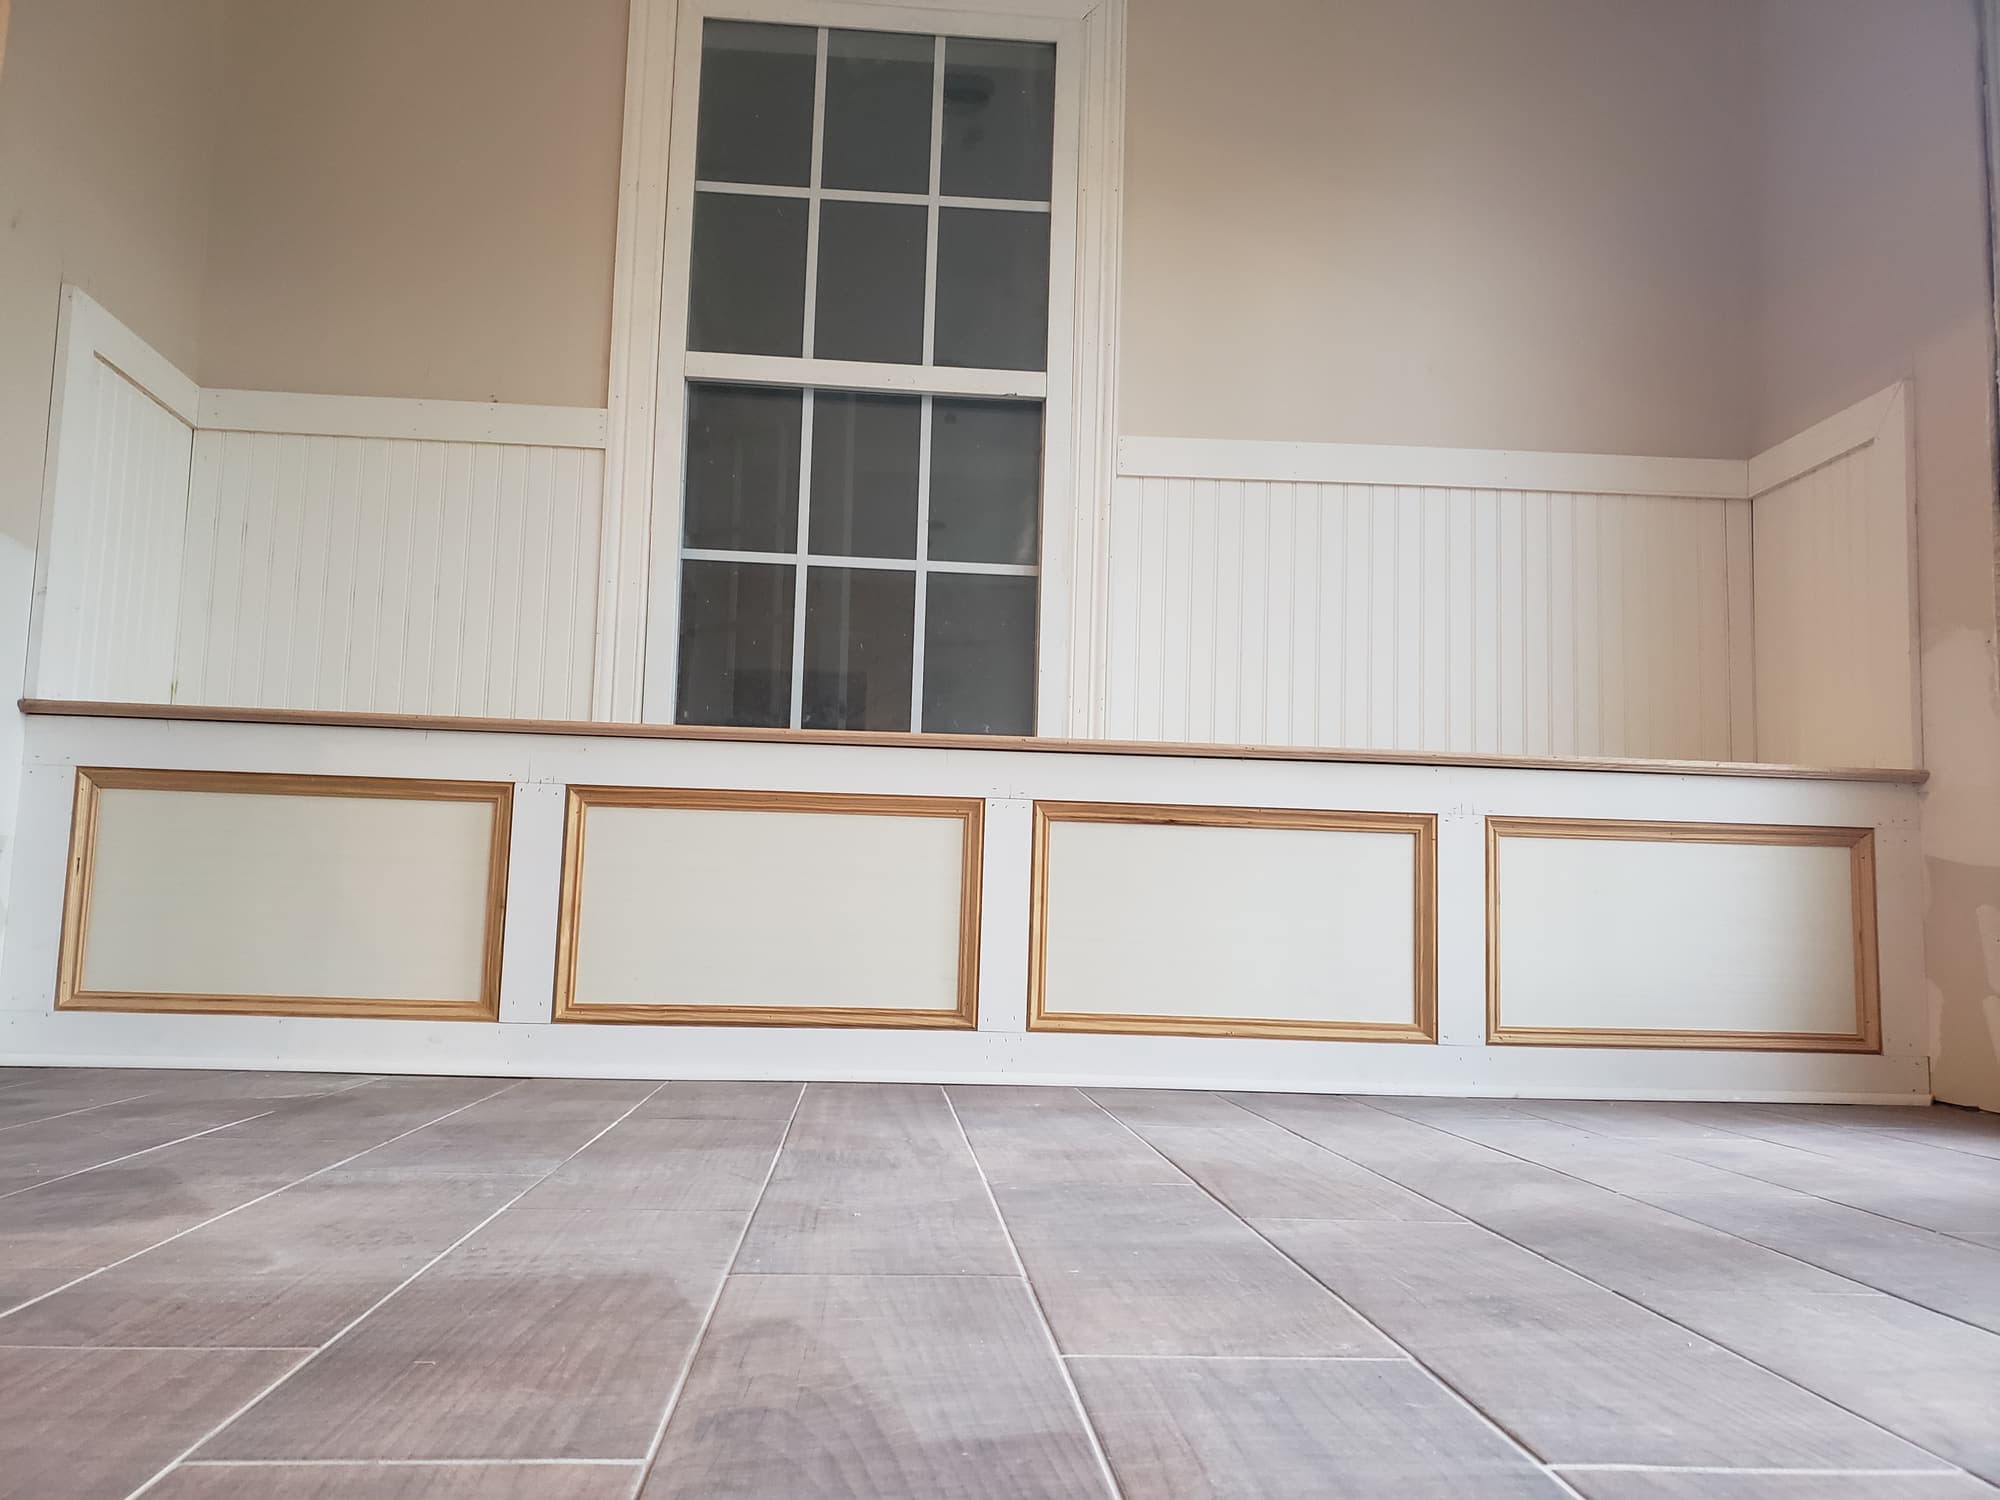
Beadboard wainscot with a chair rail and panel base, laid out from the finish floor so the cap stays level across the room even where the slab is not.
What the job includes
Scope, in the order it happens
01
Baseboard, shoe and door casing
Base runs are laid out so joints land on studs, with coped inside corners, glued mitres at outside corners and scarf joints cut at an angle on walls longer than a single stick. Casing is set to a consistent reveal off the jamb edge, typically 3/16 in., so every opening in the room reads the same. Shoe or quarter round is nailed to the base rather than to the floor, which lets a floating floor move underneath it.
02
Crown, cove and built-up cornice
Sprung crown is cut on its spring angle, most often 38/52 and is only as good as the plane it lands on, so wavy ceilings, bowed top plates and old soffit lines get corrected in drywall first. On taller walls a single stick usually looks undersized, and the profile is built up from crown plus a flat backer or bed moulding. Long runs are joined with a glued scarf, the two ends cut at matching angles so the seam laps rather than butting square, which keeps the joint from opening into a visible line when the stock shrinks.
03
Wainscot, board and batten and chair rail
Panel layout is measured from the finish floor and balanced across the wall so the last panel at a corner or door is not a sliver. Beadboard or panel stock, chair rail, panel base cap and the base itself are treated as one assembly, with blocking added where a rail has to take weight. Terminations at door casings, outside corners and stair walls are worked out on paper before anything is cut.
04
Stair skirts, risers and landing trim
Skirt boards are scribed to the treads and risers or mitred into the stringer, then the wall base is mitred into the skirt at the top and bottom so the run continues without a butt joint. Tread returns, riser edges and landing base are handled at the same time. This is fussy work and it is normally cut in place, one piece at a time, rather than pre-assembled.
05
Window stool, apron and jamb extensions
When a wall gets thicker, jambs are extended and ripped to the new wall thickness so the casing sits flat instead of rocking. Stools are notched to the opening with a consistent overhang and horn, and the apron is cut to match the casing width. This is common where an exterior wall was furred out or a window was replaced during a larger remodel.
06
Cabinet and built-in trim
Light rail, crown on upper cabinets, scribe and filler strips, panel ends, island panels and toe kick are the pieces that make factory cabinet boxes look built in. Scribes are cut to the actual wall, which in a house that has moved with the slab is often out of plumb. This work is normally sequenced with the rest of a kitchen remodeling or bathroom remodeling scope.
07
Repair and profile matching
Water damaged base, trim cut back for a wall removal and open concept job, and runs that stop dead where an old wall used to be all call for matching the existing profile rather than re-trimming the whole house. We take a sample or a cross section of the existing profile and either match it from stock, build it up from two or three pieces, or tell you plainly that the closest available match will read slightly different.
Materials and specification
What it is actually built from
Specifications vary with the house and what we find once it is open. This is the standard we work to unless there is a reason not to — and if there is, we will tell you what it is before we change it.
Beadboard wainscoting, chair rail and recessed panel base over wood-look tile.
Baseboard
5-1/4 in. and 7-1/4 in. profiles, 9/16 to 11/16 in. thick, in primed MDF or finger jointed pine; solid poplar or PVC where water contact is possible
Casing
2-1/4 to 3-1/2 in. wide, flat stock or colonial, set to a 3/16 in. reveal on the jamb edge (1/8 to 1/4 in. acceptable if held consistent)
Crown
3-5/8 in. to 5-1/4 in. sprung profiles on 38/52 degree spring; built up with a flat backer or bed moulding on 10 ft and taller walls
Wainscot
1/4 in. beadboard sheet or 1/2 in. MDF panel stock, chair rail cap set 32 to 36 in. above finish floor, panel base cap over the base
Shoe and quarter round
1/2 x 3/4 in. shoe or 3/4 in. quarter round, fastened into the base only, never through into a floating floor
Stair skirt
1x10 or 1x12 primed stock scribed to treads and risers, wall base mitred into the skirt top and bottom
Fasteners
15-gauge 2 to 2-1/2 in. finish nails into studs, plates and blocking; 18-gauge 1-1/4 to 2 in. brads on returns and small profiles; stainless or hot dip galvanized on covered patio trim
Fill, caulk and moisture
Wood filler or two part filler at joints, lightweight spackle at nail holes, paintable siliconized acrylic at the wall line; stock acclimated in the conditioned house and checked with a pin meter so the stock goes on the wall at the moisture content it will actually live at, not the one it arrived with
Local conditions
What changes because this is Houston
Gulf Coast clay, humidity and a storm season are not background detail. They decide how this work gets built.
Expansive clay keeps the house moving
Greater Houston sits on shrink swell clay, and seasonal moisture in the soil lifts and drops slab foundations. That movement is what opens drywall corner cracks, makes doors stick and pulls base away from the floor along one wall and not another. Trim is installed to the condition the house is in at the time, with coped inside corners and glued outside mitres that tolerate a little movement,.
Humidity swings move the wood, not just the house
Long humid summers and dry heated winters change the moisture content of wood trim after it is installed. Stock delivered straight off a truck and cut the same afternoon will shrink in place, so it is stacked flat inside the conditioned house with the air running for several days first. MDF is stable across its face but wicks water badly at cut ends and unprimed edges, which is why cut ends get sealed before they go on the wall.
Wet rooms and rooms that have taken water
Bare MDF base within splash range of a tub, shower, toilet or dishwasher will swell and mushroom at the bottom edge, so those runs get poplar, PVC or a factory primed composite instead. After a plumbing leak or storm water intrusion, base has to come off, the cavity has to dry and the bottom plate has to meter dry before new trim covers it. Reinstalling over a damp plate traps the moisture and the problem shows up again in the paint.
What is behind the baseboard
Pulling base off is one of the few times the bottom plate and slab edge are visible, and on the Gulf Coast that is where native subterranean and Formosan termite damage and old moisture staining turn up. If we find mud tubes, hollow plate or rot during trim removal, work stops on that wall and you see it before anything is covered. That is a treatment and repair conversation, not something to hide behind new moulding.
Permits, deed restrictions and outdoor trim
Interior trim is finish work, and on a remodel the permit questions almost always come from what is behind it, such as removing a bearing wall or moving electrical. Permitting on a remodel is driven by what sits behind the trim, not by the moulding itself, and the FAQ below covers which office handles it. Because Houston has no conventional zoning, trim and posts on a street facing patio cover are more often reviewed by deed restrictions or an HOA architectural committee than by any zoning rule, and outdoor trim needs corrosion resistant fasteners in this air., and outdoor trim needs corrosion resistant fasteners in this air.
How it runs
From the first call to the last walkthrough
1
Walkthrough and measure
We measure linear footage room by room, photograph the existing profiles so new work can be matched, and check how doors and windows are operating. We also look at what the trim has to land on: ceiling flatness for crown, floor flatness along the base line, and whether a removed soffit or a patched wall needs drywall correction first. Estimates are free.
2
Profiles, materials and who paints
You see actual profile samples held against the wall, not a catalogue page, because a 3-5/8 in. crown that looks right in a photo can look thin on a 10 ft wall. We settle material by room, paint grade or stain grade, and whether painting is in our scope or yours. That decision changes the order of operations, so it gets made before delivery.
3
Delivery and acclimation
Trim is delivered into the conditioned house, stacked flat and off the slab, with the air conditioning or heat running. It sits for several days before anything is cut. If the house has no working HVAC yet, trim waits, because installing dry stock into a humid house or humid stock into a dry house is how joints open.
4
Layout and installation
Runs are laid out so joints fall over framing, inside corners are coped where the profile allows, outside mitres are glued and pinned, and long walls are scarfed rather than butted. Casing reveals are set with a gauge block so every opening matches. Crown and wainscot are installed to a laser or level line, not to the ceiling or floor, when the house is out of level enough to show.
5
Fill, sand and caulk
Nail holes are filled and sanded flush, joints are filled and feathered, raw cuts are primed, and the wall line is caulked with a paintable siliconized acrylic. Caulk is a finish detail, not a way to close a bad joint, and gaps large enough to need it get recut. From here the work hands off to interior painting.
6
Final walkthrough
We walk the rooms with a light held at a low angle along the walls and ceilings, which shows joints, proud nail holes and waves that a ceiling fixture hides. Anything on that list gets corrected before the job is called done. You get told which lines are caulk joints that may need renewing after a season of slab movement.
Beadboard wainscoting, chair rail and recessed panel base over wood-look tile.
Stair skirt and baseboard mitred into the stringer — the kind of joint you only notice when it is wrong.
Questions
Trim Carpentry and Moulding, answered
Should trim go in before or after flooring and paint?
On most jobs the order is flooring, then base and casing, then caulk and final paint coats, because base installed after the finish floor sits down tight to it, so there is no gap left that shoe moulding has to cover. If the flooring is a floating product, the base is still installed to the floor but never fastened through it, and the expansion gap stays open behind the trim. Where the walls are being sprayed, we often prime and paint the trim before installation and touch up joints and nail holes at the end, which gives a cleaner line than brushing everything in place.
MDF, finger jointed pine, or solid hardwood?
Primed MDF is straight, has crisp profiles and takes paint well, which makes it the sensible default for painted base, casing and crown in dry rooms. Finger jointed pine holds up better to bumps and handles moisture at cut ends more forgivingly, and solid poplar or PVC belongs anywhere within splash range of a tub, shower or sink. Stain grade work is a different material conversation entirely, since the species and grain have to match across every piece in the room.
Why did my mitres open and the base gap after the first year?
Two things move in a Houston house. The slab rides on expansive clay and shifts with seasonal soil moisture, which tilts walls slightly and opens gaps at the floor along one wall while the opposite wall stays tight, and the wood itself shrinks when indoor humidity drops in winter with the heat running. The joinery described above absorbs a lot of that, and the caulk line at the wall is designed to be cut out and renewed rather than treated as permanent.
Can you match the trim in the rest of my older Houston house?
Usually, and the first step is cutting a short cross section of the existing profile so it can be compared against stock rather than matched from memory. Some older profiles are still carried in stock, and the ones that are not can often be built up from two or three current pieces, which is usually the cleanest way to get there. If the closest match will read slightly different, we say so up front and give you the option of running the new profile in one full room so the difference falls at a doorway instead of mid wall.
Do I need a permit to have trim and moulding installed?
Trim and moulding are finish work, and on their own they are not usually what drives a permit. What drives it is what sits behind the trim, such as removing or altering a bearing wall, moving electrical, or changing a structural opening, and that is permitted through the Houston Permitting Center inside city limits or through Harris County and the surrounding county and suburban offices elsewhere. Since Houston has no conventional zoning, exterior work that shows from the street is more often reviewed by deed restrictions or an HOA architectural committee, and that review is worth checking before an outdoor project starts.
What actually drives the cost of trim work?
Linear footage is only the starting point. Cost moves with profile size and whether the moulding is a single stick or a built up assembly, the number of inside and outside corners and door openings, ceiling height and access for crown, stain grade versus paint grade, and how far out of level and plumb the existing walls and ceilings are. Matching an obsolete profile and repairing damage found behind old base also add labor, which is why we measure and look behind the trim before quoting anything.
Call and talk to someone who has been doing this for 15+ years. We will look at the space, tell you what the work actually involves, and put a number on it — at no cost.